High Level Overview
The goal is to develop a flutter app that can make CRUD requests via a Laravel web API. These operations should only be allowed to authorized users via tokens. This tutorial assumes you are already familiar with the basics of both laravel and flutter and won’t go in-depth into their basics.
Setting up the Laravel API
First off, we’ll set up a fresh laravel project that provides an API our mobile app can authenticate with. Run the command
laravel new project-name
Install Laravel Sanctum
Afterward, connect up a test database and populate the .env file. Next, we’ll install Laravel Sanctum. According to the docs, sanctum provides featherweight authentication systems for SPAs, mobile applications and simple based token APIs. Sanctum will be a lot easier to set up than Laravel Passport. You can read more on this library on the official docs. Install via the command
composer require laravel/sanctum
Next up, we’ll publish the sanctum configuration and migration files using the command
php artisan vendor:publish --provider="Laravel\Sanctum\SanctumServiceProvider
Don’t migrate as yet, there are some adjustments we need to make later on. In the User Model, add HasApiTokens traits
use Laravel\Sanctum\HasApiTokens;

class User extends Authenticatable
{
	use HasApiTokens;
}
Install and configure Socialite
We’ll use Socialite to authenticate with OAuth providers that our flutter app will implement. Socialite supports Google, Facebook, Twitter and more. Users can also log into the web app via these providers. Run the command
composer require laravel/socialite
Add the array for the OAuth providers in the config/services.php file. This tutorial only uses google provider.
'google' => [
	'client_id' => env('GOOGLE_CLIENT_ID'),
	'client_secret' => env('GOOGLE_CLIENT_SECRET'),
	'redirect' => env('GOOGLE_REDIRECT_URI'),
],
You can set up credentials via the link https://console.developers.google.com/apis/dashboard. Once obtained, add the GOOGLE_CLIENT_ID, GOOGLE_CLIENT_SECRET and GOOGLE_REDIRECT_URI keys to your env file. Make sure to note the Redirect URI that you’ll be using.
Update User Table
Simply make the password field nullable in the create_users_table migration file. Since we’ll be doing authentication via tokens, the password field should be nullable.
$table->string('password')->nullable();
Once done, run the migrations
php artisan migrate
Create an API controller via the command
php artisan make:controller APIController
Next, add functions requestToken and requestTokenGoogle to this controller.
<?php

namespace App\Http\Controllers;

use Illuminate\Http\Request;
use Illuminate\Support\Facades\Hash;
use Laravel\Socialite\Facades\Socialite;
use App\Models\User;

class APIController extends Controller
{
    // login not using a provider
    protected function requestToken(Request $request){
        $request->validate([
            'email' => 'required|email',
            'password' => 'required',
            'device_name' => 'required',
        ]);

        // getting user
        $user = User::where('email', $request->email)->first();

        // checking credentials
        if( !$user || !Hash::check($request->password, $user->password)){
            throw ValidationException::withMessage([
                'email' => ['The provided credentials are incorrect.'],
            ]);
        }

        // Returning response
        return response()->json($this->getUserAndToken($user, $request->device_name));

    }

    protected function requestTokenGoogle(Request $request){
        // Getting the user from socialite using token from google
        $user = Socialite::driver('google')->stateless()->userFromToken($request->token);

        // Getting or creating user from db
        $userFromDb = User::firstOrCreate(
            ['email' => $user->email],
            [
                'email_verified_at' => now(),
                'name' => $user->name,
                'status' => true,
            ]
            );

        // Returning response
        return response()->json($this->getUserAndToken($userFromDb, $request->device_name));
    }

    //region Helpers

    private function getUserAndToken(User $user, $device_name){
        return [
            'User' => $user,
            'Access-Token' => $user->createToken($device_name)->plainTextToken,
        ];
    }
    //endregion
}
When done, add the routes and this method to your routes/api.php file.
Route::post('requestToken', [APIController::class, 'requestToken']);
Route::post('requestTokenGoogle', [APIController::class, 'requestTokenGoogle']);
That’s our base setup for the web api. Our flutter app will perform a google signin, and on a successful signin, pass an access token to our web api. The web api then either gets or creates the user to the db, getting their google profile information via Socialite’s userFromToken method. The api then returns a sanctum generated token that the mobile app can then use to perform request via authorization headers.
Setting up Flutter App
Typically, I tend to use VSCode for everything but for flutter, I strongly recommend using android studio. It just does everything better for flutter projects but pull more resources and provide a less pretty UI.
Installing Packages
This tutorial uses the http, provider, device_info, firebase_auth, google_sign_in and flutter_secure_storage. Your pubspec.yaml file should have the following dependencies added then run pub get.
dependencies:
  flutter:
    sdk: flutter
  http: ^0.12.2
  provider: ^3.0.0
  device_info: ^0.4.2+8
  firebase_auth: ^0.16.0
  google_sign_in: ^4.4.4
  flutter_secure_storage: ^3.3.5
Once done, also make sure to update your minSdkVersion to 23 for firebase_auth to work. The firebase_auth package requires a bit of setup before running the app so let’s address that first.
Setting up Firebase
Log into your firebase console and Create a project. Follow through the steps presented. Once the project has been created, head over to the Project Overview page and click the android icon to get started adding firebase to the app. Follow the steps provided, the trickiest of those steps is getting the Debug signing certificate SHA-1. While firebase indicates that this step is optional, it’s actually required for testing google sign in. To get your debug key, open the file android/build.gradle. In android studio, then click the option to Open for Editing in Android Studio. Android studio will take a moment to open this file. Once android studio is finished loading, expand the Gradle tab on the right side and navigate to android/Tasks/android/signingReport as shown in the screenshot below.
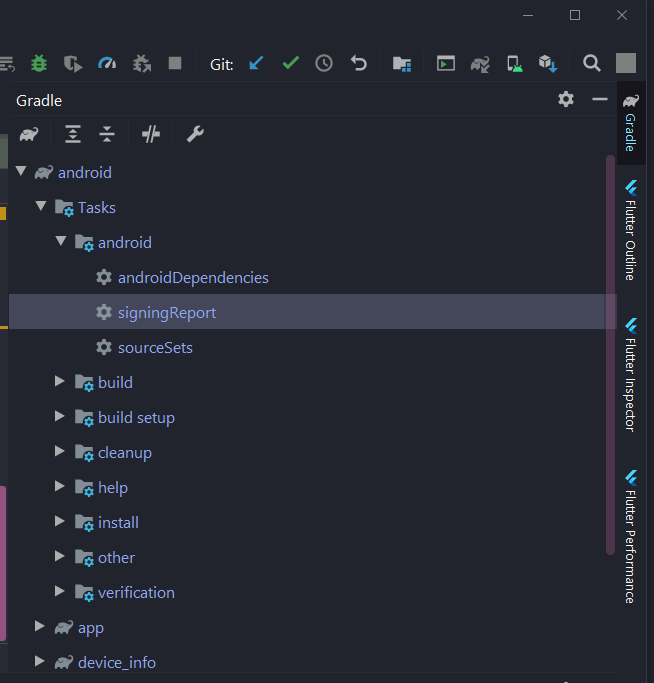
Double click that value and android studio will return the debug key that the project is currently using. Remember that on release build, the release key should be added to firebase. Once that’s done, head back to overview and click the Authentication card. Follow through the steps and on the sign-in providers window, enable Google sign in. Firebase auth should now be ready to roll.
Local Storage Util
I am using the following package structure for this project.
lib
	- pages
	- providers
	- utils
	- widgets
	main.dart
We’ll start by creating a utils/local_storage.dart to store access tokens. You can also use this file later on to save http responses.
import 'package:flutter_secure_storage/flutter_secure_storage.dart';

enum LSKey{
  user,
}

class LocalStorage{
  static FlutterSecureStorage _storage;

  // run this in main.dart to initialize the FlutterSecureStorage property
  static LocalStorage create(){
    _storage = new FlutterSecureStorage();
    return LocalStorage();
  }

  //region Retrieve Functions

  static Future<String> retrieve(LSKey key) async {
    return _storage.read(key: key.toString());
  }

  //endregion

  //region Save Functions

  static Future<void> save(LSKey key, String data) async {
    _storage.write(key: key.toString(), value: data);
  }

  //endregion

}
This Local Storage helper is pretty simple and will be the entry point for reading/writing anything securely. Note that at the time of writing, the flutter_secure_storage package does not work on web apps. The LSKey class helps to keep usage a bit stricter. You can modify this file later on to use a combination of flutter_secure_storage and shared_preferences. Next, let’s build a HttpClient class to perform our API requests. Store this in utils/http_client.dart.
import 'package:flutter/material.dart';
import 'package:http/http.dart' as http;

// enum for http verbs
enum HttpRequestType{
  get,
  post,
  delete
}

// args to be sent to client to make request
class HttpArgs{
  final String url;
  final HttpRequestType verb;
  final dynamic body;
  final bool useAuthorization;

  HttpArgs({
    @required this.url,
    this.verb = HttpRequestType.get,
    this.body = '',
    this.useAuthorization = true,
  });
}

class HttpClient {
  static const API_URL = 'http://192.168.0.101:8000/api/';
  static dynamic _authHeaders;

  // helper to build urls
  static String apiUrl(String path){
    return API_URL + path;
  }

  // make http request
  static Future<http.Response> request(HttpArgs args) async {
    http.Response response;
    switch(args.verb){
      case HttpRequestType.get:
        response = await http.get(args.url,
            headers: args.useAuthorization ? _authHeaders : {});
        break;

      case HttpRequestType.post:
        response = await http.post(args.url,
          body: args.body,
          headers: args.useAuthorization ? _authHeaders : {}
        );
        break;

      default:
        throw Exception('Invalid Http Request Type');
        break;

    }
    return response;
  }

}
The API_URL property is web api’s address that we can add paths to. The _authHeaders property is where you’ll store the sanctum token once retrieved make authorized API calls later on. Once this class is imported, we can make request via the static method HttpClient.request(args) which is convenient. Now that we have both LocalStorage and HttpClient set up, we can create a login widget. Create the file lib/pages/auth/login.dart and paste in the contents.
import 'package:device_info/device_info.dart';
import 'package:flutter/material.dart';
import 'package:firebase_auth/firebase_auth.dart';
import 'package:google_sign_in/google_sign_in.dart';
import 'package:gaptt_mobile/utils/http_client.dart';
import 'package:gaptt_mobile/utils/local_storage.dart';

class Login extends StatefulWidget{
  @override
  _LoginState createState() => _LoginState();
}

class _LoginState extends State<Login>{

  //region Properties

  FirebaseUser _user;
  final FirebaseAuth _auth = FirebaseAuth.instance;
  final GoogleSignIn _googleSignIn = GoogleSignIn();

  //endregion

  @override
  void initState(){
    super.initState();
  }

  @override
  Widget build(BuildContext context){
    return Scaffold(
      appBar: AppBar(),
      body: Column(
        children: [
          RaisedButton(
            child: Text('Sign in With Google'),
            onPressed: () async {
              loginWithGoogle();
            },
          ),
        ],
      ),
    );
  }


  //region Login Methods
  Future<bool> login(String email, String password) async {
    DeviceInfoPlugin deviceInfo = DeviceInfoPlugin();
    AndroidDeviceInfo androidInfo = await deviceInfo.androidInfo;
    print('logging in with credentials');

    // build post body
    dynamic body = {
      'email': email,
      'password': password,
      'device_name': androidInfo.id,
    };

    // build httpArgs
    HttpArgs args = new HttpArgs(
      url: HttpClient.apiUrl('requestToken'),
      verb: HttpRequestType.post,
      body: body,
      useAuthorization: false,);

    // make request and await response
    final response = await HttpClient.request(args);
    if(response.statusCode == 200){
      print('user authenticated.');
      LocalStorage.save(LSKey.user, response.body);
      return true;
    }else{
      print('authentication failed');
      return false;
    }

  }

  Future<bool> loginWithGoogle() async {
    GoogleSignInAccount googleSignInAccount = await _googleSignIn.signIn();
    GoogleSignInAuthentication googleSignInAuthentication = await googleSignInAccount.authentication;
    AuthCredential credential = GoogleAuthProvider.getCredential(
        idToken: googleSignInAuthentication.idToken,
        accessToken: googleSignInAuthentication.accessToken
    );
    AuthResult authResult = await _auth.signInWithCredential(credential);
    _user = authResult.user;
    FirebaseUser currentUser = await _auth.currentUser();

    // getting device name
    DeviceInfoPlugin deviceInfo = DeviceInfoPlugin();
    AndroidDeviceInfo androidInfo = await deviceInfo.androidInfo;

    print("User Access Token: ${googleSignInAuthentication.accessToken}");

    // building request body
    dynamic body = {
      'token': googleSignInAuthentication.accessToken,
      'device_name': androidInfo.id,
    };

    // making request to web api
    HttpArgs args = new HttpArgs(
      url: HttpClient.apiUrl('requestTokenGoogle'),
      verb: HttpRequestType.post,
      useAuthorization: false,
      body: body,
    );

    // make request and await response
    final response = await HttpClient.request(args);
    if(response.statusCode == 200){
      print('user authenticated using google sign in. sending info to accountProvider');
      LocalStorage.save(LSKey.user, response.body);
      return true;
    }else{
      print('authentication failed');
      return false;
    }
  }
//endregion
}
The UI itself is as simple as it gets, a raised button that when clicked, will ask the user to sign in with their google account. The two main functions in this program are login and loginWithGoogle, both of which have routes created in our web api. Once either of them are called, the result is a sanctum token that you then save and use in _authHeaders to access the API. The final step is the main.dart file.
import 'package:flutter/material.dart';
import 'package:gaptt_mobile/pages/auth/login.dart';
import 'utils/local_storage.dart';

void main() {
  LocalStorage.create();
  runApp(MyApp());
}

class MyApp extends StatelessWidget {
  // This widget is the root of your application.
  @override
  Widget build(BuildContext context) {
    //Initializing localstorage

    return MaterialApp(
      title: 'Sanctum Mobile',
      home: new Scaffold(
        body: Center(
            child: Login()
        ),
      ),
    );
  }
}
And that’s it! Run your web server via the command
php artisan serve --host=0.0.0.0
This command runs your web app while making it accessible to other computers on your network via the address http://192.168.0.101:8000/. This is necessary for the mobile app to reach it. When you run the flutter app, click the login button and you should see the google login prompt. Once authorized, the app will communicate with the web server and return you the user information and the sanctum token. You’d then save that token to make future authorized requests.
Troubleshooting Notes
Plugin project :firebase_core_web not found
If you encounter this error when building, try replacing android/settings.gradle file with
include ':app'

def flutterProjectRoot = rootProject.projectDir.parentFile.toPath()

def plugins = new Properties()
def pluginsFile = new File(flutterProjectRoot.toFile(), '.flutter-plugins')
if (pluginsFile.exists()) {
    pluginsFile.withReader('UTF-8') { reader -> plugins.load(reader) }
}

plugins.each { name, path ->
    def pluginDirectory = flutterProjectRoot.resolve(path).resolve('android').toFile()
    include ":$name"
    project(":$name").projectDir = pluginDirectory
}